# How To Implement NodeJS Based JWT Auth?
Here you will find how to implement Node Based JWT authentication in your application. As this is additional integration with Vuexy Angular we've not provided it built-in but you can implement by following this article.
WARNING
If you want to implement NodeJS based JWT Auth in starter-kit, you first need to implement JWT authentication in starter-kit. You can read How To Add JWT In Starter Kit.
Important
Download Angular NodeJS Based JWT Authentication example code from here (opens new window).
As of now in the template, we were using fake-backend to implement the JWT auth. Now in this article, we will learn how to implement real JWT auth with NodeJS.
Let's go through step by step :
# Step 1 : Removing / commenting fake-backend code
TIP
Below mentioned steps are the same for starter-kit as well as full version template.
Navigate to file : app.module.ts, path : /src/app/app.module.ts
Here you will find a const fakeBackendProvider which is imported from app/auth/helpers, Remove / comment that code from providers array & import as well.
Example :
...
import { fakeBackendProvider } from 'app/auth/helpers'; // Remove or comment this code
...
...
...

  providers: [
    { provide: HTTP_INTERCEPTORS, useClass: JwtInterceptor, multi: true },
    { provide: HTTP_INTERCEPTORS, useClass: ErrorInterceptor, multi: true },

    // provider used to create fake backend, comment while using real api
    fakeBackendProvider // Remove or comment this code
  ],
# Step 2 : Download & install required package files
Download the zip file Angular NodeJS Based JWT Authentication example (opens new window), extract the folder follow the steps.
- Install Node.js and npm from https://nodejs.org/en/download/.
- Install all required npm packages by running npm install from the command line in the project root folder (where the package.json is located).
- Start the api by running npm start (or npm run start:dev to start with nodemon) from the command line in the project root folder, you should see the message Server listening on port 4000.
- Follow the instructions below to test with Postman or to hook up with an example Angular application.
Before running in production also make sure that you update the secret property in the config.json file, it is used to sign and verify JWT tokens for authentication, change it to a random string to ensure nobody else can generate a JWT with the same secret and gain unauthorized access to your api.
A quick and easy way is join a couple of GUIDs together to make a long random string (e.g. from https://www.guidgenerator.com/ (opens new window)).
TIP
Download postman application from here (opens new window)
# Step 3 : Run JWT API server
To start JWT API server use command npm start from command line in the project root folder.
You will see the message : Server listening on port 4000 that means our API server is running at port : 4000
We have successfully started NodeJS based JWT auth API server.
# Step 4 : Run Template & Login
TIP
To get a Real JWT token you must keep the server running as mentioned in step 3.
Run the full version template or starter-kit with command ng serve & authenticate the user via login-in page.
Now you notice that in Local Storage we get something like this as key-value pair :
key : currentUser

Value :
{
  "id":1,
  "email":"admin@demo.com",
  "firstName":"John",
  "lastName":"Doe",
  "avatar":"avatar-s-11.jpg",
  "role":"Admin",
  "token":"eyJhbGciOiJIUzI1NiIsInR5cCI6IkpXVCJ9.eyJzdWIiOjEsInJvbGUiOiJBZG1pbiIsImlhdCI6MTYxNTc1NTI3MX0.ni9EUtSfvxuqM-lxRq_-xX_LBAJtFnZjrlZbXse36RM" // Real Token
}
Hence, We have successfully implemented the NodeJS JWT auth in full-version / starter-kit template.
# Step 5 : Testing the Node.js JWT Auth API with Postman (OPTIONAL)
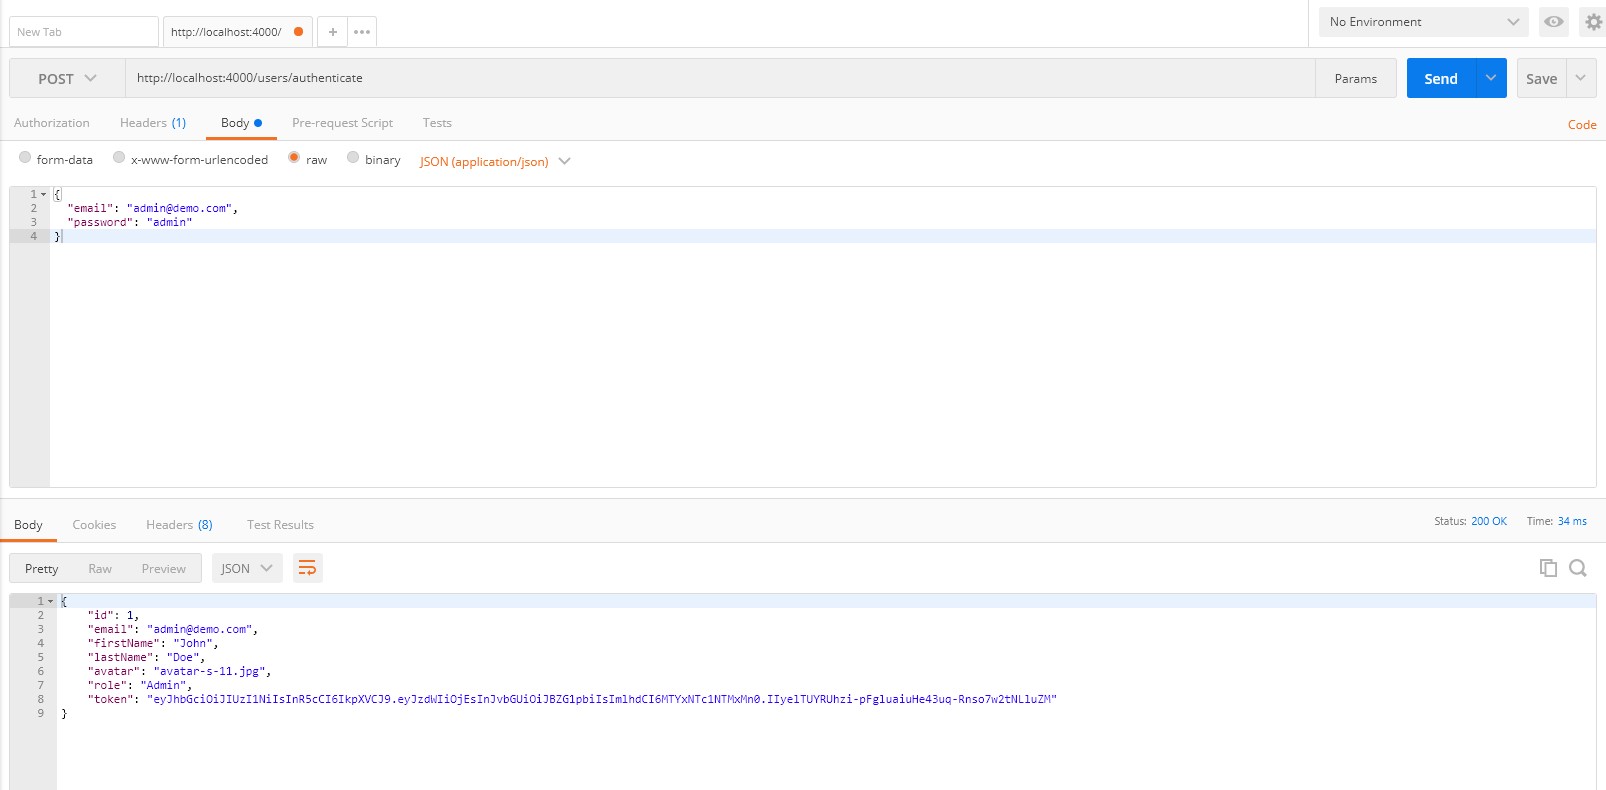
You can test the authentication of a user with the API and get a JWT token. Follow these Steps :
- Open a new request tab by clicking the plus (+) button at the end of the tabs.
- Change the HTTP request method to
POSTwith the dropdown selector on the left of the URL input field. - In the URL field enter the address to the authenticate route of your local API -
http://localhost:4000/users/authenticate - Select the
Bodytab below the URL field, change the body type radio button toraw, and change the format dropdown selector toJSON. - Enter a JSON object containing the test username and password in the
Bodytextarea as mentioned below :
{
  "email": "admin@demo.com",
  "password": "admin"
}
- Click the "Send" button, you should receive a "200 OK" response with the user details including a JWT token in the response body, make a copy of the token value because we'll be using it in the next step to make an authenticated request.
Result :
